Gluten Free Authentic Italian Focaccia
Rate This Recipe:
Looking for a simple yet delightful homemade Gluten Free bread? Try my Gluten-Free Italian Focaccia! With just a few steps, you can enjoy a warm, aromatic focaccia that tastes like a slice of Italy. This recipe is a cherished family tradition, now made accessible for those avoiding gluten. Perfect for a nostalgic, delicious, and heartwarming experience. Olive oil in this recipe is packed with antioxidants and healthy fats, promoting heart health and reducing inflammation. Ready to bake? Scroll down for the full recipe and bring some rustic charm to your kitchen!
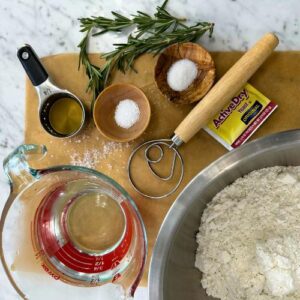
Equipment
- large bowl
- dough whisk or wooden ppoon
- Tea towel or plastic wrap
- 13 inch baking dish or focaccia baking pan
Ingredients
- 4 cups gluten free flour plus one extra cup on the side
- 2 tsp instant yeast 1 packet
- ½ tsp sugar
- ½ tsp sea salt
- 2 cups warm water about 110℉
- ¼ cup olive oil
My Favorite Toppings - Option #1
- fresh rosemary
- sea salt
- fresh cracked pepper
My Favorite Toppings - Option #2
- 14 oz San Marzano tomatoes crushed
- 1 cup black olives
- ½ med red onion thinly sliced
- dried oregano
Instructions
- In a large bowl, add flour, salt, sugar, and instant active dry yeast and mix using a dough whisk.4 cups gluten free flour, ½ tsp sugar, ½ tsp sea salt, 2 tsp instant yeast
- Slowly, pour in warm water and stir with a dough whisk or wooden spoon.2 cups warm water
- Next slowly add ¼ cup of olive oil, and continue to stir. The dough will be sticky, but it will not be watery. If it appears watery, add more flour.¼ cup olive oil
- Cover the bowl with a clean tea towel or plastic wrap and let the dough rise for a minimum of two hours at room temperature. Take note the dough will do best in a warm environment. If it is not a warm environment, place it in your oven with the oven light on.
- Using a 13 inch baking dish or focaccia baking pan, coat the pan with olive oil. Note-alternatively you can use a large baking sheet, the focaccia will not be as tall but still amazing!
- After the focaccia dough has risen, place the dough gently into the greased baking dish. Coat your hands with olive oil, so they will not stick to the dough and pat and push the dough gently until it fills the entire baking dish evenly.
- When finished, let the dough rise for another 30 minutes.
- Preheat your oven to 400℉
- After the focaccia dough has risen a second time in the baking pan, press your fingers over the dough to make indentations.
- Sprinkle the top with fresh rosemary, sea salt and fresh cracked pepper.fresh rosemary, sea salt, fresh cracked pepper
- Bake in the lower section of your oven for 20 to 25 minutes.
- This last step is optional… I like to turn my boiler on and place the pan on the top shelf of my oven and broil it for one minute, to get the crust very golden brown.
Video
More About This Recipe
Kitchen Tools You’ll Need
- Large mixing bowl
- Dough whisk or sturdy wooden spoon
- Clean tea towel or plastic wrap
- 13-inch baking dish or focaccia pan (or large baking sheet)
- Measuring cups and spoons
- Olive oil brush (optional but handy)
- Spatula or bench scraper
Cooking Tips
- Let it rise — Patience pays off! A two-hour rise (plus 30 minutes more in the pan) helps the yeast develop that signature airy texture.
- Keep your hands oily — Gluten-free dough can be sticky; coating your hands with olive oil makes spreading and patting a breeze.
- Don’t panic about graininess — Gluten-free flour behaves differently, but once baked, the texture transforms beautifully.
- Broil for extra crunch — That one-minute broil at the end? Game changer for a perfectly golden crust.
- Use quality ingredients — I love using the Cup4Cup gluten-free flour endorsed by Chef Thomas Keller — it’s a perfect 1:1 swap and gives a gorgeous, bakery-quality result.
NOTES:
I have tried to make this recipe several different ways, and I highly recommend letting the yeast rise for two hours or more for the first rise, and 30 minutes or more for the second rise. It will give you the most beautiful focaccia you have ever seen. When using this gluten-free flour, do not be alarmed when the dough feels grainy after the second rise, just pat it down and smooth it out with your hands, covered in olive oil and proceed as normal. Trust the process! After it bakes for 20 to 25 minutes it comes out spectacular! I used the gluten-free flour that is endorsed by Chef Thomas Keller-because it’s a one-for-one substitution ratio which makes gluten-free baking, very simple! And we all want simple! Tried this recipe?Let us know how it was!